Make your student thesis accessible
This is how to make your student thesis as accessible as possible. This is important for persons with visual impairment or dyslexia, for example, to access your text.
Steps to Make the Essay Accessible
Outlined below are eight things you can do to make your essay as accessible as possible.
1. Use the student thesis template
Use GIH's student thesis template for Word to write the thesis.
2. Use the styles in the thesis template
Use the styles in the student thesis template. It is important that all headings are formatted using the Heading 1, 2 and 3 styles.
3. Put spaces between paragraphs
Do not press Enter repeatedly to create extra spacing in the text. Instead, use paragraph spacing that you set by right-clicking in the text and selecting "Paragraph." Enter the desired distances in the "Before" and "After" boxes under the heading "Distances".
4. Specify the title of your document
In order for your thesis to be approved as an accessible document, it must have a title specified as a property.
To manually enter the title and other properties in the Word document, select "File" and then "Info". After that, type in the desired title in the "Title" property on the right.
5. Insert alternative text for images, diagram and figures
Alternative text, alt text, is a description that is read aloud through screen readers used by a visually impaired person. When inserting images and other graphics, such as charts, into your documents, you should always be careful to always add alt text that clarifies for those who cannot see your document but have it read aloud.
It is recommended that you use short alternative texts and that you focus on what is important in the image when writing the alternative text.
Follow these steps to enter alt text
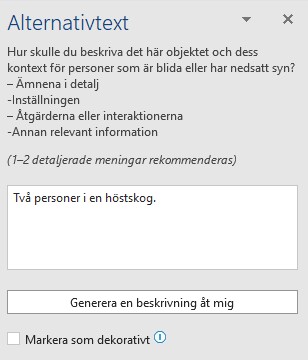
After you insert an image into your document, the image usually gets an automatically generated alt text. You should always check the alt text and possibly change it to an appropriate text.
If you want to change it, right-click on the image and select "Edit alt text". You can enter your own text or use the "Generate a description for me" button to get the auto-generated description.
You do the same to add alt text to pictures, charts, drawn shapes, or other objects. When you right-click on the image/chart/object, a context menu will appear with the "Edit alt text" command. Click on that and type the desired alt text in the panel that appears (see image below).
Alt text for charts
You create alt texts for charts in the same way that you create alt texts for images. Right-click on the chart and select "Edit alt text".
Of course, it is very important that an alternative text for a chart clearly explains what the chart shows, for example, "Chart showing that the number of inhabitants increases from January to July."
To create accessible tables in Word, there are a few things to keep in mind:
- Write headings in each column. Don't leave a heading blank.
- The tables must not contain any merged cells. A table of merged cells will not be accepted by the Availability Checker.
- Use table formats with good readability that clearly delineate rows and columns, such as lines.
- If the table has a header row, you can select the header row, right-click and select "Table Properties" and select "Repeat as header row" at the top of each page.
- Make sure that tables that have a header row also have it selected in the "Table Design" tab that appears when the table is selected. Select the table, click the "Table Design" tab, and select the "Header Row" checkbox.
- Select the table, right-click, and select "Table Properties." Type in the desired alt text in the "Alt Text" tab. Tables should have a descriptive text in the same way as other objects, but one difference is that in the case of tables you can enter both a heading for the table and a more detailed descriptive text.
7. Run the Accessibility Checker in Word
When you're done with your document, test it for accessibility using the Word Accessibility Checker.
Here's how:
- Select "File", "Info" and "Check Errors".
- Click on "Check availability".
Now your document will be checked, and if you have missed tagging an image, for example, this will be displayed on the right. If you have tables with merged cells or similar, you will be prompted to correct this.
Correct any errors and test your document again. When you're done, you can save it as a pdf.
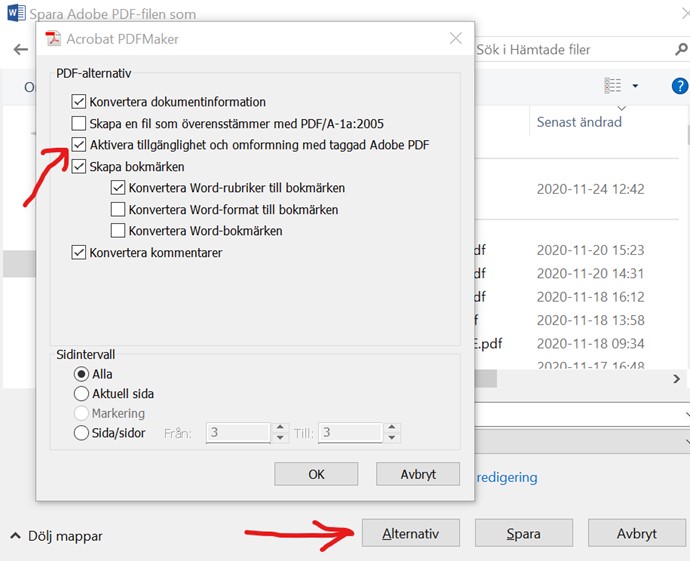
Save your document as a PDF by clicking on "File" and selecting "Save as PDF".
The first time you do this, you can click the "Options" button and make sure that the checkbox "Enable accessibility and transformation with tagged Adobe pdf" is checked.
Then click "OK" and save your document as a PDF document.
Please note that the above text and the images are from September 2022. Future updates to Office and Adobe may affect the names and placement of commands.
On this page
Student thesis template
Use GIH's thesis template to make your thesis as accessible as possible.